
 Aug 15,2026
You inspect your formed parts and see thin, unwanted plastic fins along the edges—flash. It is not just cosmetic; flash requires secondary trimming, adds labor costs, and can cause parts to stack improperly or fail quality inspection. You have adjusted temperatures, checked pressures, and still the flash persists.
Flash is excess plastic material that escapes from the mold cavity between mold halves or at parting lines during the forming process. It is a common defect in plastic forming that can significantly increase production costs and reduce part quality.
This guide examines the root causes of flash in thermoforming and provides systematic solutions to eliminate it—without guesswork or trial-and-error.
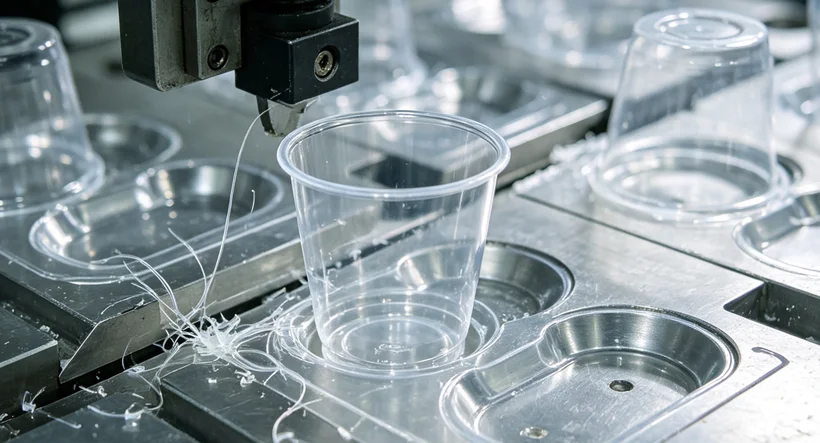
Flash occurs when plastic sheet material flows or is forced into spaces where it should not go—typically between mold halves that do not seal completely, or at parting lines where pressure forces material into gaps.
Several factors can contribute to flash formation:
| Root Cause | How It Creates Flash | Most Common In |
| Excessive sheet temperature | Material becomes too fluid and flows into mold gaps | Both PET and PP (especially near upper processing limits) |
| Insufficient clamping force | Mold halves separate slightly under forming pressure | High-pressure forming or deep-draw applications |
| Mold misalignment or wear | Gaps at parting lines allow material escape | Older tooling or frequent changeover setups |
| Overpressure during forming | Forces material into existing gaps between mold components | Positive-pressure forming systems |
What this means for your production: Flash is rarely caused by a single factor. More often, it is the combination of temperature being slightly too high, clamping pressure being marginally insufficient, and mold wear creating a small gap—each factor alone would be acceptable, but together they produce flash. Understanding this interaction is key to solving the problem permanently.
The most frequent cause of flash in thermoforming is sheet temperature that is too high for the material and mold combination.
Why it happens: When the plastic sheet is heated beyond its optimal forming temperature, it becomes excessively fluid. Instead of stretching cleanly into the mold cavity, the material flows into any available gap—including the parting line between mold halves.
The thermal expansion factor: In mold design, temperature distribution and mold deformation significantly affect flash generation. When mold components heat up during production, thermal expansion can cause them to separate slightly—and when the sheet is already too hot, the molten plastic flows into these newly created gaps.
How to address it:
Reduce forming temperature gradually until flash disappears—but monitor for incomplete fills or poor detail
Ensure temperature is uniform across the sheet; hot spots can cause localized flash even when average temperature is correct
For PP, be especially cautious—its narrower processing window makes it more prone to flash at elevated temperatures
Verify that heating element zones are calibrated correctly and not overheating edges
Practical translation: A temperature reduction of just 5-10°C can often eliminate flash without affecting part quality. However, if temperature is reduced too far, the sheet may not fill the mold completely. The goal is to find the minimum temperature that produces acceptable parts without flash.
If mold halves do not seal completely during forming, plastic material will escape through the gap—creating flash.
Why it happens: The forming process applies significant pressure to the sheet (both vacuum and positive pressure). If the clamping system cannot hold the mold halves together against this pressure, they separate slightly. The separation may be only a fraction of a millimeter—but that is enough for fluid plastic to flow through.
When molds are subjected to forming pressure and thermal expansion, gaps of just 20 microns can be enough to cause flash. In many cases, standard machining tolerances (20µm or less) are sufficient to prevent flash under normal conditions, but thermal expansion can increase gap sizes beyond this threshold.
How to address it:
Verify that the machine's clamping system can apply adequate force for the forming pressure being used
Check for debris between mold halves—even small particles can prevent complete sealing
Inspect mold components for wear that may prevent full closure
For systems with servo-controlled clamping, confirm that the servo motors are applying consistent pressure across all cycles
Different thermoforming machine configurations provide different clamping capabilities. To see how station count and servo systems affect clamping precision, review the plastic thermoforming machine configurations overview.
Mold design and condition play a central role in flash generation. Even with correct temperature and clamping, a worn or poorly designed mold will produce flash.
Why it happens: Mold parting lines are the interfaces where mold halves meet. If these surfaces are not perfectly flat and clean, gaps exist. Over time, these surfaces wear—especially in high-volume production with abrasive materials.
How to address it:
Inspect parting line surfaces regularly for wear, scoring, or damage
Verify that mold halves are properly aligned—misalignment creates gaps at the parting line
For molds with complex parting lines, consider whether a floating mold design could help: some mold designs allow one half to self-align with the other, eliminating flash by ensuring complete sealing along the parting line
Check for thermal expansion differences: if one mold half expands more than the other, gaps can open at high temperatures
Prevention tip: For multi-cavity molds, ensure all cavities are properly balanced. Uneven pressure distribution can cause localized flash in cavities where mold separation is greatest.
In positive-pressure thermoforming (using compressed air to form the part), excessive pressure can force material into mold gaps.
Why it happens: Forming pressure must be high enough to push the sheet into the mold cavity, but if it exceeds what the mold sealing system can contain, the material will escape at the parting line.
How to address it:
Reduce forming pressure gradually until flash is eliminated—but ensure part detail is still achieved
Verify that pressure is applied uniformly; localized pressure spikes can cause flash in specific areas even when average pressure is acceptable
For machines with programmable pressure control, review and adjust the forming pressure profile
When flash appears, use this systematic approach rather than making random adjustments:
Does it affect all cavities or only some? If only some, mold misalignment or localized wear is indicated
Does it appear at the start of production and then disappear? This suggests temperature stabilization issues
Does it worsen as production continues? This suggests thermal expansion or heating element drift
Verify sheet temperature: is it within the recommended range for your material?
Confirm clamping pressure is adequate for the forming process
Inspect mold parting lines: are they clean and undamaged?
Reduce forming temperature by 5°C and test
If flash persists, increase clamping pressure slightly
If flash still persists, inspect mold alignment and consider a more thorough mold inspection
Once flash is eliminated, save the parameters for future reference
Machines with recipe storage enable quick recall of proven settings when changing products
Different products—cups, lids, trays—have different flash risks based on part geometry. For application-specific guidance, see Sinoplast plastic cup machines and thermoforming machines product applications.
A manufacturer producing 2 million PS cups per month notices flash appearing on the outer rim of cups after running for three hours. The flash is consistent across all cavities.
Diagnosis: The problem starts after three hours of production—this points to thermal expansion. As the mold heats up during sustained production, mold halves expand and slight gaps open at the parting line. When the sheet is at forming temperature, material flows into these gaps.
Solution: Reduce forming temperature by 5°C (the sheet was near the high end of the processing range). Additionally, check that the cooling system is maintaining consistent mold temperature throughout the run. With the temperature adjustment, flash is eliminated and remains absent for the full shift.
A converter produces both PS cups and PP trays on the same machine. PP runs produce occasional flash, while PS runs do not.
Diagnosis: PP has a more restrictive processing window than PS. The same machine settings that work for PS may not be optimal for PP. PP often requires a slightly lower forming temperature relative to its range—even a small temperature difference can cause flash because PP becomes more fluid at elevated temperatures.
Solution: Establish separate recipe parameters for PP and PS production. For PP, reduce forming temperature by 10°C from the settings used for PS and adjust clamping pressure to accommodate PP's different flow characteristics. With recipe storage on the machine, changeovers between materials are quick and consistent.
You now have a systematic approach to eliminating flash on your thermoforming machine. The key factors to monitor:
| Factor | Why It Matters | Recommended Action |
| Sheet temperature | Excessive temperature causes material to flow into gaps | Reduce temperature gradually—5-10°C often eliminates flash |
| Clamping force | Insufficient force allows mold separation under pressure | Verify clamping pressure matches forming pressure requirements |
| Mold condition | Worn or misaligned parting lines create gaps | Regular inspection and maintenance of mold surfaces |
| Thermal stability | Temperature changes during production create expansion gaps | Maintain consistent mold temperature; allow warm-up before production |
Flash is not inevitable. It is a symptom of one or more correctable factors—temperature, clamping, or mold condition. By systematically addressing each potential cause, you can eliminate flash and reduce secondary trimming operations.
Once you have identified and corrected the factors causing flash, comparing specific machine features—temperature control systems, clamping mechanisms, and servo precision—becomes the logical next step for selecting equipment that supports consistent, high-quality production without flash.
Thermoforming Defects: Webbing, Thinning, and Warpage—Causes and Solutions
Mold Maintenance for Thermoforming: Preventing Wear and Misalignment
Temperature Profile Optimization for PP vs. PET Thermoforming
Clamping Systems in Thermoforming: Mechanical vs Servo-Controlled
Thermoforming Troubleshooting Checklist
Sep 01,2026
We are a professional plastic machinery provider in China.